Designing a Nearfield Bass-Reflex Bookshelf Speaker in Speaker Box Lite

A detailed guide showing how to design a compact nearfield bass-reflex bookshelf speaker for a computer setup using Speaker Box Lite. Includes driver selection, alignment choice, box shaping, component mounting, flared ports, and blueprint generation.

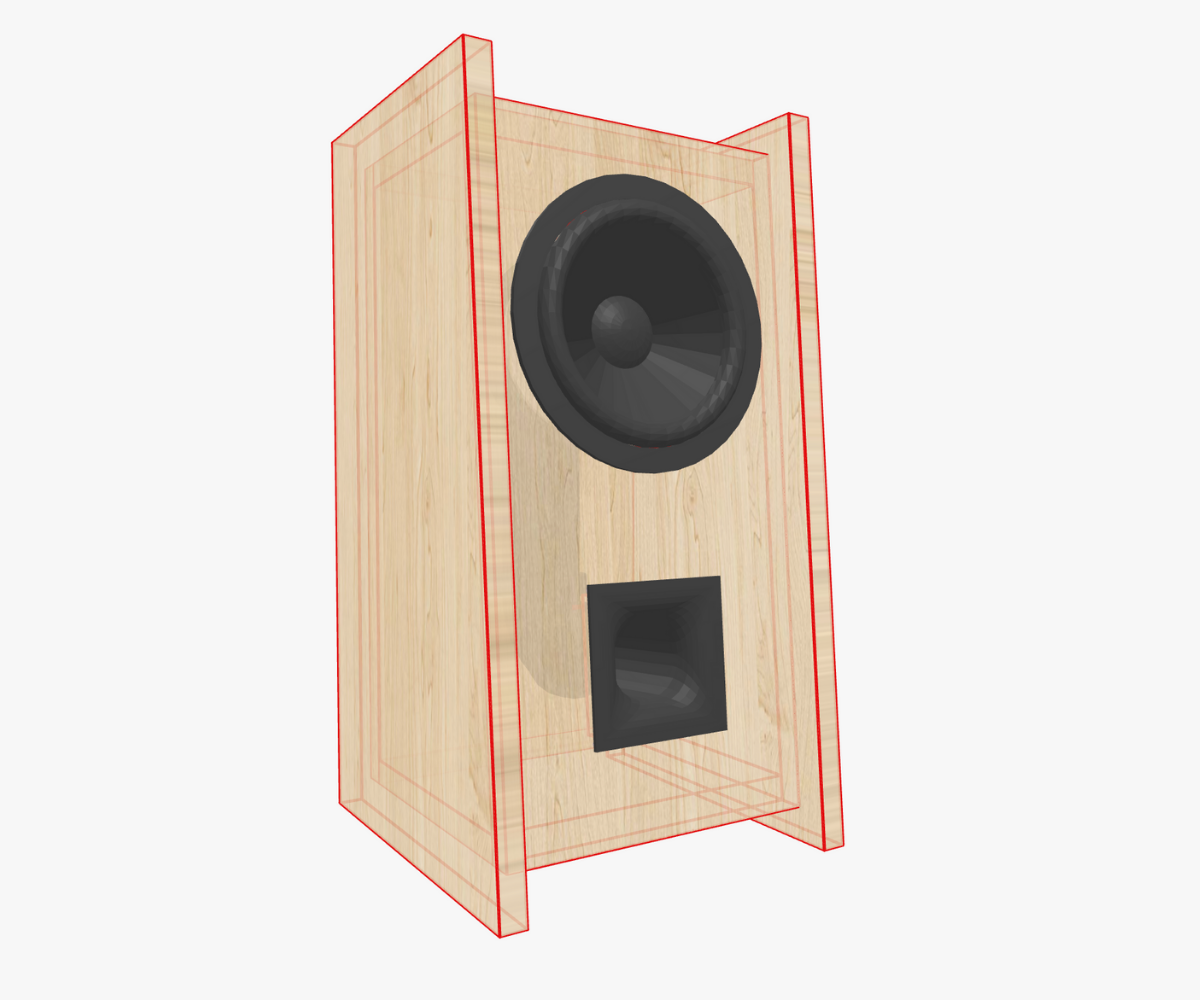
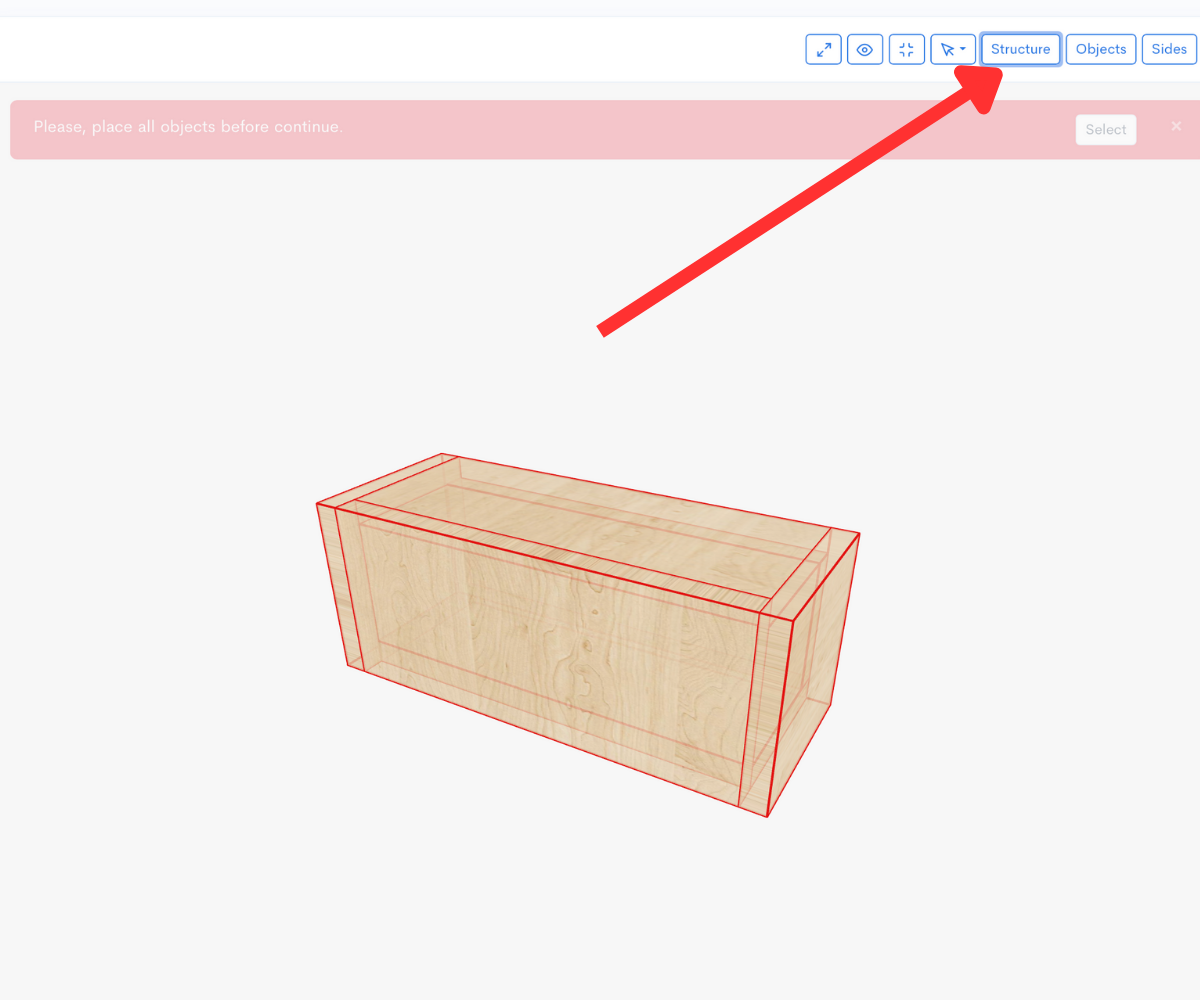
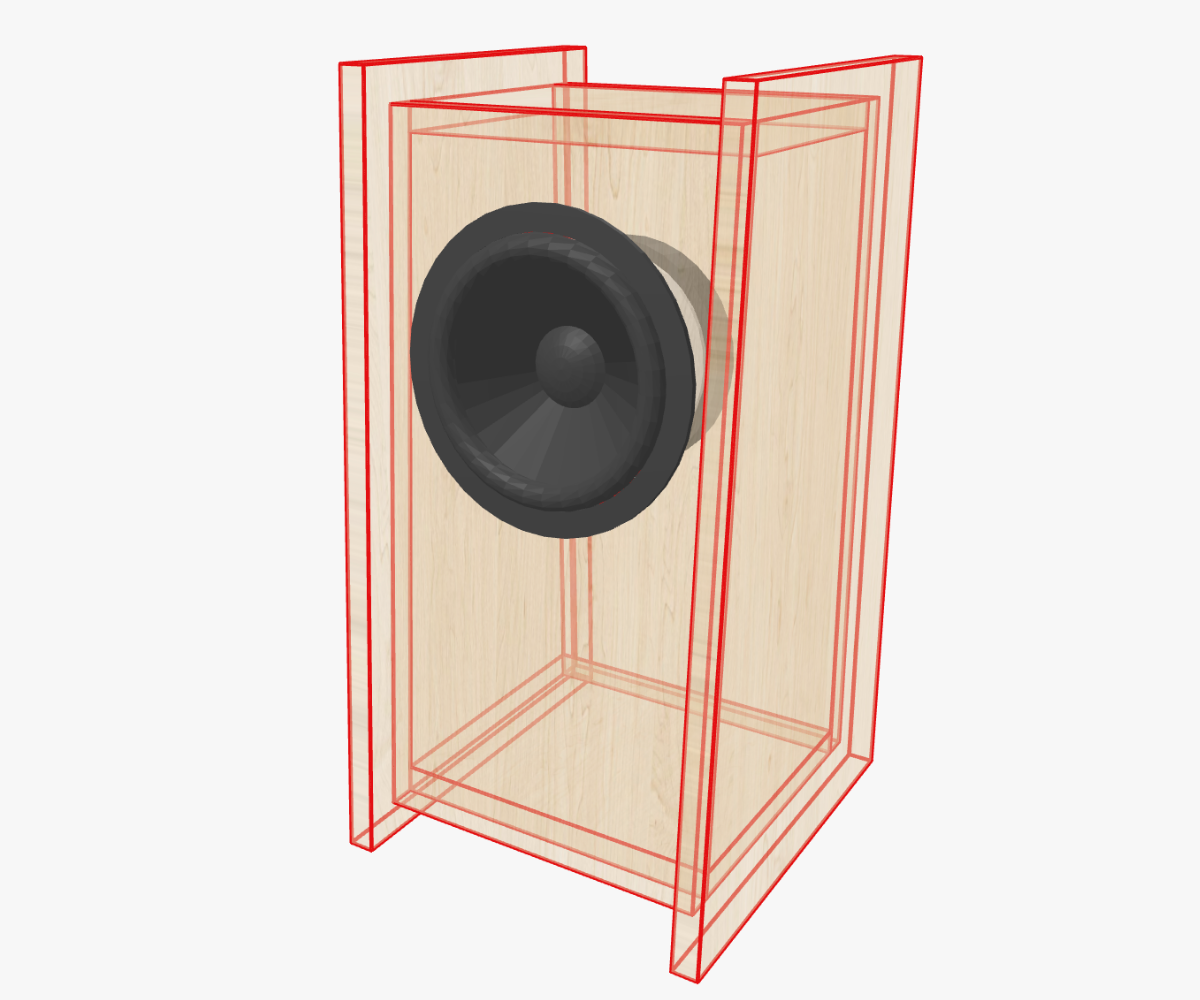
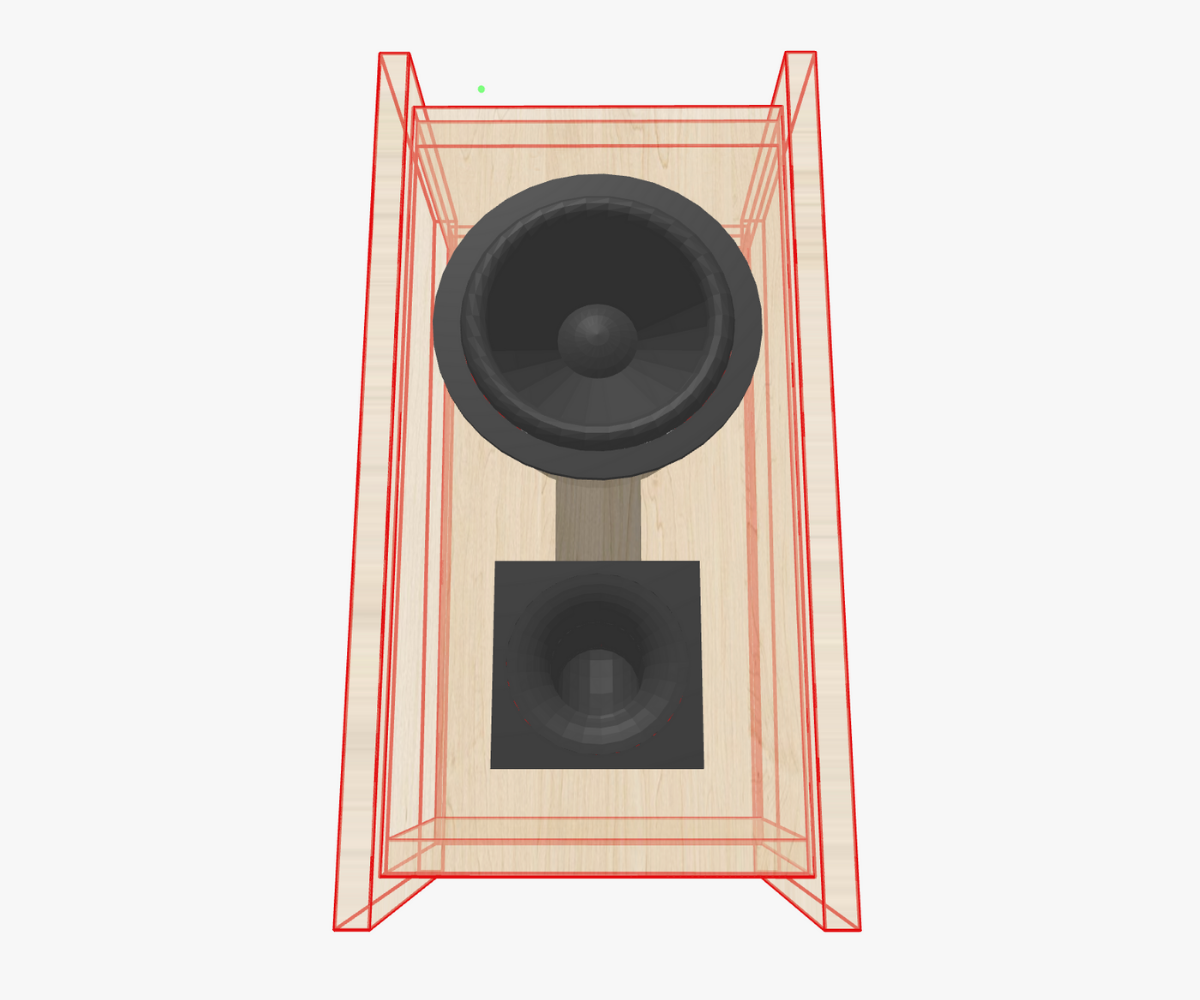
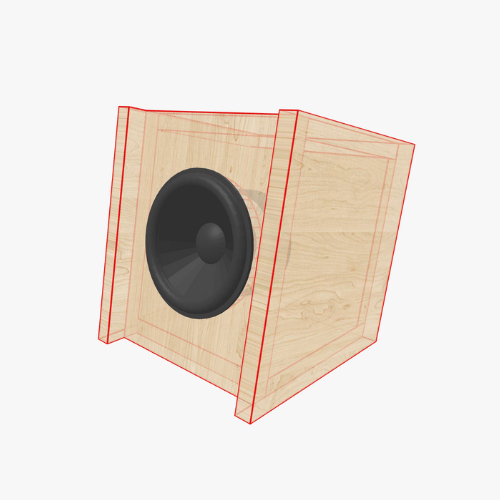
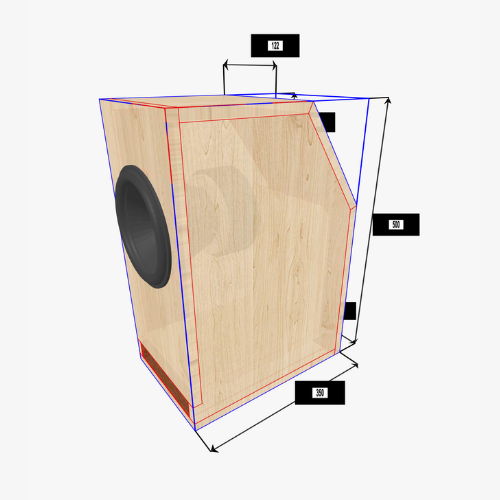
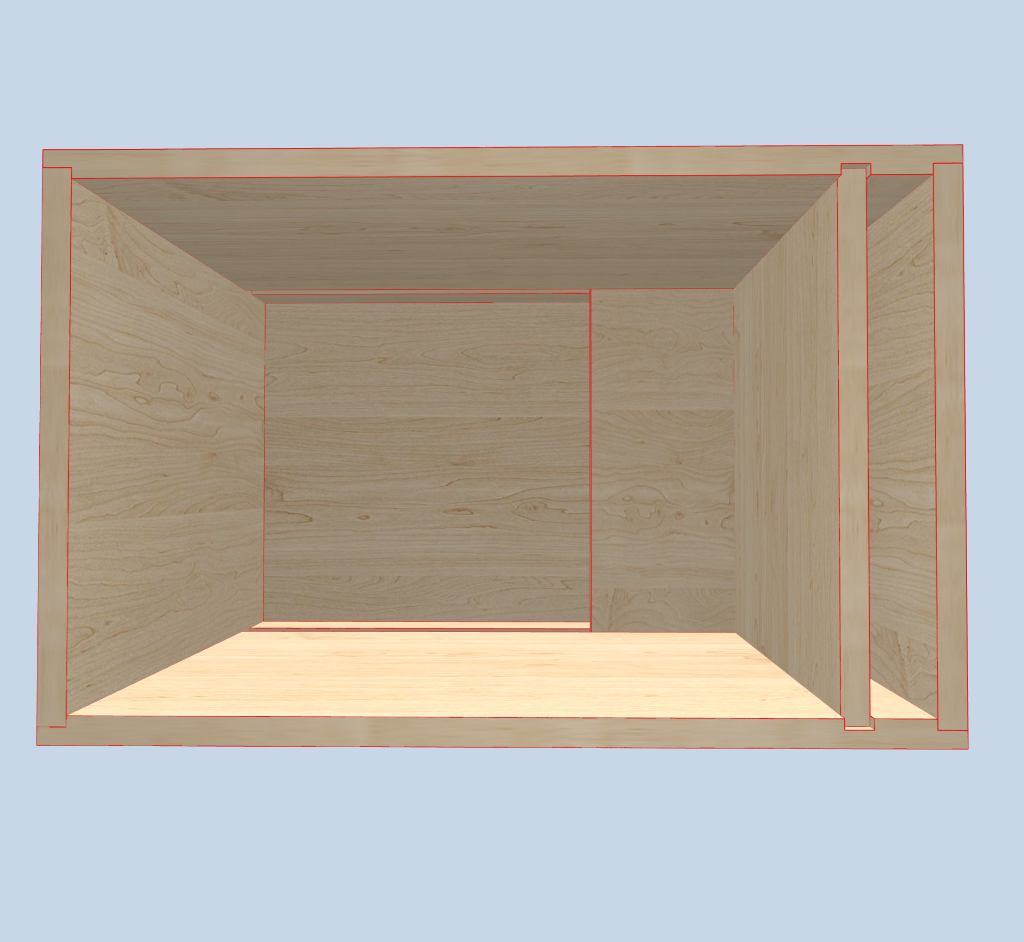
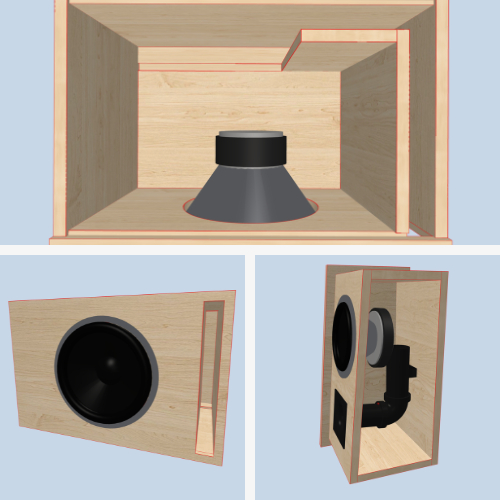
Designing a small loudspeaker enclosure is always a journey of balancing what we want, what our room allows, and what the driver can reasonably deliver. And when the goal is a nearfield bookshelf box for a computer desk—compact, stylish, directed towards the listener—the challenge becomes even more engaging. In this article, we will walk through a complete design process inside Speaker Box Lite, building a bass-reflex box from the ground up. The final result will resemble the reference design you saw in the screenshots: a one-side-trapezoid enclosure gently tilted toward the listener, compact in volume, visually clean, and acoustically balanced.

Rather than jumping straight into numbers, charts, and tables, this guide will unfold as if you were sitting at your desk, exploring options, making reasoning-based decisions, and letting the app assist you where needed. You’ll see how simulations motivate changes in volume and tuning, how small adjustments in geometry influence the look and ergonomics, and how to navigate Speaker Box Lite’s tools to shape the box exactly the way you imagine it.


Image demonstrates the result we want to achieve.

A Short, Grounded Look at Bass-Reflex Enclosures

Before we put our hands on the virtual lumber, let’s take a moment to clarify what a bass-reflex enclosure actually does. Not in an academic, textbook-heavy way, but in a practical builder-oriented mindset.

A bass-reflex (or ported) box works by combining the driver’s rear radiation with a resonant air mass inside the port. When tuned properly, the port reinforces the system’s low-frequency output, extending bass response while also improving efficiency in the tuning region. You can think of the port as a secondary sound-emitting element—but one that works only in a relatively narrow band. Above that band, the driver dominates; below it, both driver and port lose authority together.

The beauty of a bass-reflex bookshelf speaker is that you can gain meaningful low-end emphasis without dramatically increasing cabinet size—something especially useful when designing nearfield systems. But there’s responsibility: bass-reflex designs depend heavily on correct box volume, driver selection, and tuning frequency. Go too small and tuning can get boomy or unnatural; go too large and the enclosure becomes impractical or too soft in transient behavior for desktop use.

Thankfully, Speaker Box Lite integrates well-studied alignments, predictive curves, and visual tools that let you shape the box by ear and by reason—not just by numbers.

Choosing the Driver: Dayton Audio DS135-8

The driver is the soul of your loudspeaker. And for our story today, we will build around Dayton Audio DS135-8, an approachable, great-sounding small woofer that works beautifully in compact ported designs. You can either search for it inside the app’s database or input the parameters manually from its datasheet. Speaker Box Lite supports both approaches, but using the built-in database makes the workflow smoother.

Once selected, the app loads all relevant parameters—Fs, Vas, Qts and so on. And with that, we can finally think about the kind of sonic character we want.

For a nearfield setup, where the listener sits just a meter or two from the speakers, clarity and balance matter much more than raw low-end power. You want bass extension, but not at the cost of a bloated response. This is why the next step—selecting an enclosure tuning profile—is critical.

Exploring Volume Generation: Picking the Right Alignment

Inside the Enclosure tab in SBL, you’ll find a set of volume-generation modes. These alignments are classical acoustic “recipes” that use the driver’s parameters to propose a specific enclosure volume and tuning frequency. Each profile leans toward a certain sonic character:

  • Max flat amplitude
  • Optimum volume
  • Bass
  • Boom Box BB4 / SBB4
  • Quasi-Third Butterworth QB3 / SQB3
  • Chebyshev C4 / SC4

You can read more about these alignments in this article

While all of them are useful, they differ in their priorities. For example, “Max flat amplitude” is designed to give the smoothest, most neutral amplitude curve at the cost of a larger box, while BoomBox alignments lean toward more energetic output in the low region with optimized efficiency.

Since this is your project, I’ll take you through the actual decision-making process I used while building the final reference box.

Starting with Max Flat Amplitude

If you care about sound quality—and especially nearfield accuracy—the natural instinct is to begin with Max flat amplitude. This alignment gave me a suggested enclosure volume around 6.5 liters, with a tuning close to 54 Hz. The curve was indeed smooth and well-controlled. Acoustically, it was a very promising start.

But once you consider the physical form, 6.5 L becomes a little bulky for a desktop speaker that must sit comfortably beside your monitor. The increased depth might push the cabinet too far towards the back wall or simply dominate the desk visually.

So, in the spirit of experimentation, I gently reduced the volume from 6.5 L down to around 4 L. The app instantly recalculated the tuning response, and while the box became much more manageable in size, the efficiency and low-end output dropped noticeably. The curve became greener in my simulation—a visual nudge from SBL that something was being sacrificed.

This is where listening with your eyes becomes part of the craft. You’re not forced to accept any one preset. You’re encouraged to experiment.


The image compares a maximally flat alignment (red) with my 4-liter test box tuned to the same frequency (green).


Trying the BB4 Alignment

Curious to find a sweet spot, I switched to BB4, one of the Boom Box alignments known for balancing efficiency and physical compactness. Immediately, the app produced a proposed volume close to 4.9 liters and a tuning around 52–53 Hz.

And suddenly the chart made sense.

The box shrank to a size that fits comfortably on a desk, yet its low-frequency curve still remained healthy and confident. The blue line generated by the BB4 suggestion sat slightly lower than the 6.5-liter Max Flat line, but not by much—and crucially, it was much better than the squeezed 4-liter experiment.

At this moment the design felt right. This is something that often happens during speaker building: you look at two curves, compare them mentally, and accept an imperceptible compromise in exchange for real-world practicality. I ended up choosing the 4.9-liter blue-line result, essentially gaining back 1.6 liters of saved space without losing noticeable low-end realism.

Your ears, your desk space, and your driver thank you for it.


The image shows a maximally flat alignment (red), my 4-liter test box at the same tuning (green), and the BB4 alignment (blue).
The image shows the transfer-function group delay for the maximally flat alignment (red), my 4-liter test box at the same tuning (green), and the BB4 alignment (blue). The middle variant (blue) provides an excellent delay response.
The image shows cone displacement for the maximally flat alignment (red), my 4-liter test box at the same tuning (green), and the BB4 alignment (blue). All variants stay below the driver’s X-max.

Choosing the Port Diameter: Balancing Noise, Length, and Practicality

Before we step into the 3D modeling stage, there is one more crucial decision to make: selecting the port’s diameter. This is one of those quietly complex operations in speaker design—something that looks simple on the surface, but significantly affects the final acoustic performance.

A port that is too small in area behaves like a bottleneck. As air velocity rises, you begin to hear turbulence and audible chuffing, especially in a nearfield setup where your ears are close to the enclosure. But a port that is too large forces the tuning to rely on a very long tube. Such a tube not only becomes difficult to fit inside a compact cabinet, but it may also introduce resonances that interact poorly with the system.

This is a classic trade-off: airflow versus practicality.

Speaker Box Lite helps resolve this trade-off using its built-in helper tool. On the Enclosure tab, next to the port Diameter field, press the “calc” button. A modal appears with several airflow presets.

For this build, I chose the Less quality option—not because we aim for low quality, but because it generates a diameter suitable for our compact box without pushing the port to impractical lengths. The helper suggested around 37 mm, which gives us a reasonable port size and workable port length for a 4.9-liter enclosure.

With the diameter ready, the foundation for the physical box is complete.


I’ll use a round port — click “calc” to get help choosing the port area.
I’ll use the “Less quality” option — it gives a good result with no audible noise.
The blue line shows an excellent port air-velocity result for the chosen port area.

Moving into the 3D World: Shaping the Cabinet


Box with default width, height, and length.


With volume secured, it’s time to give the box a physical presence. Switching to the 3D Box tab, SBL presents the speaker as a simple rectangular enclosure with default width, height, and depth. This is the perfect blank canvas.

Our goal is to make a box that doesn’t just sit on the desk—it should look towards you. Slightly tilted, almost like a pair of studio monitors positioned for proper nearfield listening. And this brings us to one of the most underrated features in SBL: the ability to change the foundation used for extrusion.

Changing the Foundation to a One-Side Trapezoid

This small but meaningful design choice gives the enclosure its personality. To adjust the foundation, open the Structurescreen, then open the box properties. There you’ll find the option to select the extrusion foundation. Among several shapes, the One-Side Trapezoid fits our needs perfectly. Once applied, it gives the box that characteristic forward tilt.

In the same panel, I selected the material thickness—12 mm plywood, a sensible value for a small, nearfield enclosure. It’s stiff enough, easy to source, and keeps the weight down without compromising rigidity.

You can also type in height and length values in the same window, but for this build we will let the app compute the height later based on useful volume, while we manually set width and depth afterward. Once these foundation settings are confirmed, the Save button locks them in and refreshes the box in 3D view.

It is always satisfying to see the box immediately transform into something more personalized.

Steps to open the Box Properties window.
Steps to change the box’s foundation and material thickness.

Adjusting Dimensions with Box Bounds Enabled

To fine-tune the enclosure’s external geometry, I enabled the Box Bounds overlay—one of the cleanest and most user-friendly ways to handle cabinet dimensions inside Speaker Box Lite. When activated, the boundaries of the box appear with editable dimension markers.

Clicking on these markers lets you directly change the width, length, or height. For a compact bookshelf speaker, I decided to use 182 mm width and 190 mm depth, leaving the height as an auto-calculated dimension that the app adjusts so that the total internal volume remains 4.9 liters.

One nice aspect of this workflow is that you don’t have to chase the volume manually. Speaker Box Lite handles the volume preservation logic, letting you focus purely on ergonomics and the optical feel of the proportions.

The face of the speaker is now angled up, the enclosure footprint is compact, and the geometry is balanced. Time to refine the joinery.


Steps to enable the Box Bounds option.
Total result

Refining the Look with Butt Connections

A small aesthetic detail can dramatically change how a speaker feels. In this case, I wanted the left and right panels of the enclosure to be slightly wider so that the front, back, top, and bottom panels sit recessed inside the frame—similar to flush-mounted designs used in boutique monitors.

To achieve this, open the menu shown in the screenshot and choose the Box’s edges options. SBL highlights each face using green quads. By selecting the quads corresponding to the left and right faces, I changed their butt connection type to the one that positions those panels outward, effectively giving them visual prominence.

This modification prepares the cabinet for an aesthetic where the remaining faces will be slightly recessed. Once this is in place, the next step is deepening those remaining faces.


Deepening the Remaining Faces

Clicking any face opens a modal with several geometric parameters, one of which is face deepening. For each of the non-side faces (front, back, top, bottom), I entered 16 mm of deepening. This pushes the panel inward to create that beautiful recessed effect we wanted earlier.

Once applied, the 3D view updates instantly, showing a refined cabinet reminiscent of handcrafted speakers with subtle design flair. It’s a small detail, but it elevates the build from “DIY box” to “instrument-grade craftsmanship.”


Click on the face to open its properties modal.
Repeat this for all remaining faces to see the final result.

Mounting the Speaker in the Inclined Face

Now comes a satisfying moment: placing the driver on the enclosure. Inside the Objects Inspector, you’ll see the DS135-8 driver that we selected earlier. Tap the driver, then tap the face where you want to mount it. Since our front panel is angled, it makes perfect sense to install the driver there.

After the driver appears, you can long-press it to activate the blue alignment disk. This allows you to slide the driver into perfect center alignment. Once released, the driver snaps into its place, sitting confidently on the tilted front face.

The box begins to come alive—it gains identity.


Adding the Port, Centering It, and Preparing It for Flaring

With the woofer mounted, it is time to add the port. Just as with the speaker, open the Objects Inspector, select the port, and click on the same inclined face—or another face if you prefer an alternative aesthetic.

The port appears as a cylindrical placeholder. Again, long-press, wait for the blue disk, and slide the port until perfectly centered. The geometry now begins to resemble the final product.

But this box deserves more sophistication than a simple straight tube.

Configuring a Flared Port with a Rectangular Mouth Waveguide

A flared port reduces air turbulence and audible chuffing, which are especially noticeable at nearfield distances. To configure this:

  1. Open the port’s properties window from the Objects Inspector.
  2. In the Flared ends section, choose a flare type—only one per end is allowed.
  3. Set the flared radius to 16 mm.
  4. For the mouth, choose Mouth waveguide type: RECT.
  5. For the mouth connection, also choose RECT.
  6. Add 10 mm of additional width and height to expand the rectangular waveguide mouth.


Speaker Box Lite instantly alters the geometry, creating a subtle rectangular transition that helps airflow and gives the speaker a more modern, sculpted front aesthetic.

At this point the enclosure looks almost exactly like the one in the screenshots—a compact trapezoid, slightly angled, with a beautifully integrated flared port and centered driver.


The Final Step: Blueprints and Cutting

With all parts in place, the final task is mundane but necessary: preparing the cutting maps. Open the Drawing screen and SBL generates the blueprint automatically. The measurements reflect your chosen geometry, including trapezoid angles, recessed faces, butt connections, flared port openings, and precise panel sizes.

Now the journey moves away from screens and into the workshop. Cut the panels from 12 mm plywood, assemble them as modeled, mount the driver and port, and you’ll have the same elegant bass-reflex bookshelf speaker that we designed throughout this article.

It’s small, expressive, angled directly toward the listener, compact enough for a desk, and acoustically tuned for balanced nearfield playback.


Exporting the Port to STL for 3D Printing

Before we wrap up the design process, it’s worth mentioning one more powerful feature in Speaker Box Lite. Once your port is configured—with its flare, mouth waveguide, and all geometric refinements—you can export the port as an STL 3D model. This allows you to print it on any standard 3D printer. Custom ports often outperform off-the-shelf tubes by providing smoother airflow, better flare transitions, and a perfect fit for your enclosure. With STL export, the virtual design becomes a physical component you can install directly into the box.

Export the 3D port model to print it with a 3D printer.

Conclusion

Designing a loudspeaker is a dialogue between acoustics and aesthetics. By using Speaker Box Lite not only for simulation but also for modeling, shaping, and visual reasoning, you gain a toolset that removes guesswork and replaces it with intuitive, responsive design flow.

From choosing the DS135-8 driver, through comparing alignments, refining volume, sculpting the trapezoidal cabinet, aligning components, and shaping a flared port, each stage built toward a coherent final product. What began as a flat graph and a set of Thiele-Small parameters ended as a polished 3D enclosure ready for woodworking.

And best of all—it’s your box. Designed to fit your desk, your aesthetic taste, your listening distance, and your sonic priorities.

👉 The project designed in this article is also available directly in Speaker Box Lite by the link


Share: